Good lifestyle product photography does not need a studio, a full crew, or expensive gear. A phone with a decent camera, a window, a few props, and a clear idea of the moment you want to capture is enough to produce publishable images. Adobe's guide to product photography explains it well: scene-based images help shoppers visualise scale, routine, and real use in a way that plain packshots simply cannot.
Here is your quick-start checklist before you read further:
- Kit: phone or camera, tripod or clamp mount
- Light: north-facing window or a two-light starter rig
- Styling: one prop, one surface, one clear customer moment
- Settings: aperture f/4–f/8, ISO 100–400, white balance locked
- Workflow: 10 shots covering hero, scale, in-use, detail, and packaging
Pro Tip: If you can shoot today, follow sections 2–8 for the full DIY workflow. If you need campaign-ready images for a product launch or multi-channel rollout, skip to the hiring guidance in section 9.
Key takeaways
Good lifestyle product photography is achievable on a small budget when you control your light, plan one clear customer moment, and edit consistently across the full set.
| Point | Details |
|---|---|
| Light before lenses | A reflector and a north-facing window outperform expensive glass in poor conditions. |
| One customer moment | Every styling decision should serve a single, specific scene your buyer recognises. |
| RAW files save time | Shooting RAW gives you full control over white balance and exposure in post without quality loss. |
| Consistent editing | A single Lightroom preset applied across a set multiplies perceived professionalism. |
| Jarvisandco for pro shoots | For product launches, multi-channel campaigns, or premium SKUs, Jarvisandco handles brief to delivery. |
Table of Contents
- What kit do you actually need for lifestyle product photography?
- How do you get great lighting for product shots?
- Where do you source props and how do you style a believable scene?
- How do you compose and direct hands or models for natural shots?
- What camera settings should you use for product shots?
- How do you edit lifestyle images for a consistent, on-brand look?
- What are the best shot ideas for a ten-image lifestyle set?
- When should you hire a professional photographer instead of shooting DIY?
- Why consistent product visuals are worth the investment
- Jarvisandco photography: professional results without the guesswork
- Sources
What kit do you actually need for lifestyle product photography?
You do not need a mirrorless camera to start. A modern smartphone, a stable surface, and decent light will outperform a DSLR in bad conditions every time.
Phone vs camera
A phone is enough when your images go to Instagram, a Shopify product page, or a small ad set. The computational photography in current flagship Android and iPhone models handles noise, dynamic range, and colour well in good light. Step up to an entry-level mirrorless (Sony ZV-E10, Canon EOS M50 Mark II) when you need shallow depth of field for product-in-hand shots, consistent RAW files across a large catalogue, or print-ready resolution.
Tripod and accessories
- A clamp tripod (£15–£25 from Amazon UK) handles phones and small cameras on a table or shelf
- A full-height tripod with a ball head gives you overhead flat-lay angles and consistent framing
- A remote shutter or self-timer prevents camera shake on slow exposures
- A 50mm equivalent prime lens (or 35mm on crop sensor) is the go-to for natural-looking product shots; a macro lens opens up detail shots on small items like jewellery or skincare
Small accessories that make a big difference
- A 5-in-1 reflector (£12–£20) bounces fill light and kills harsh shadows
- White foam board from a craft shop does the same job for free
- Adhesive putty (Blu Tack) holds props and products at angles without visible supports
- A vinyl or paper backdrop roll (£20–£40) gives you a clean, repeatable surface
Budget tiers at a glance
- Basic: phone + clamp tripod + foam board reflector (under £30 total)
- Mid: entry mirrorless + 50mm prime + softbox (£400–£700)
- Pro: interchangeable lenses + continuous LED panels + backdrop stand (£1,000+)
Pro Tip: Spend money on light before you spend it on lenses. A £20 reflector used well beats a £500 lens in flat, overcast light.
How do you get great lighting for product shots?
Light is the single variable that separates a convincing lifestyle image from a flat snapshot. Start with what you already have.
Natural light
A north-facing window on an overcast day gives you soft, even light with no harsh shadows. South-facing windows work too, but direct sun creates contrast that is difficult to control. Shoot within two hours of midday in winter, or in the morning and late afternoon in summer when the sun is lower and less intense.
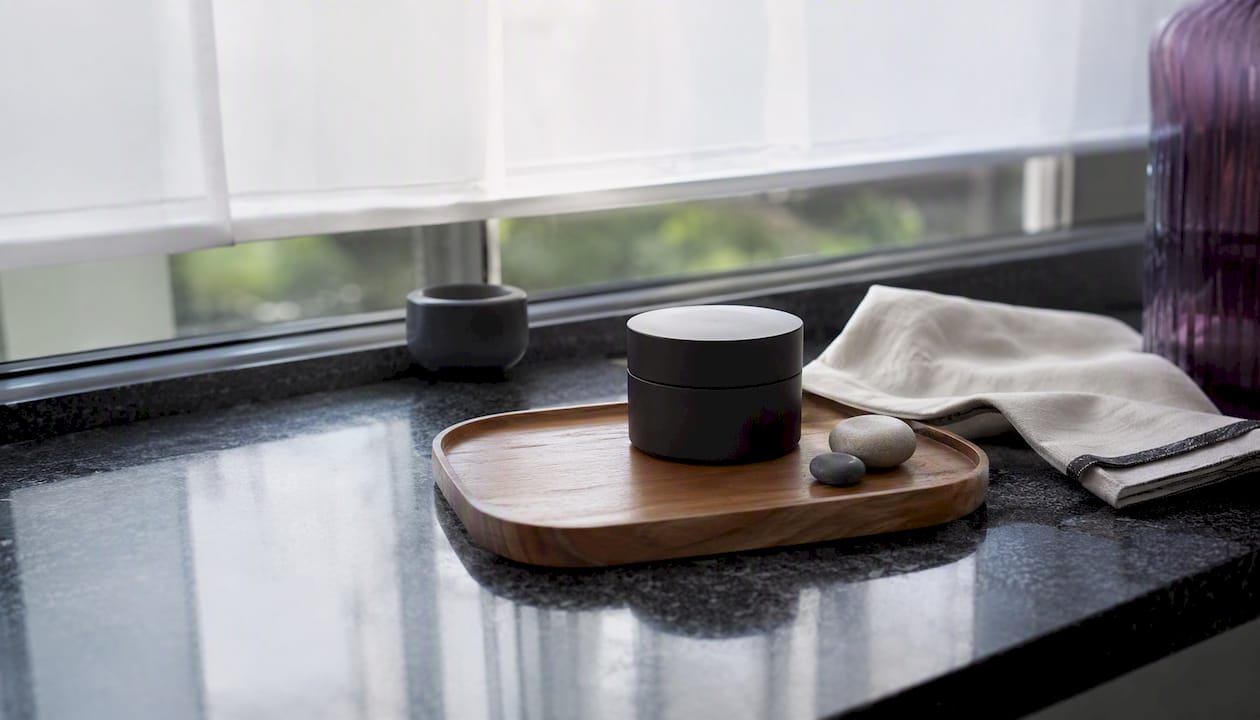
To reduce contrast, tape a sheet of white cartridge paper or a thin white curtain over the window. This acts as a scrim and spreads the light. Place a white foam board on the opposite side of the product to bounce light back and fill the shadow side.
A simple two-light setup
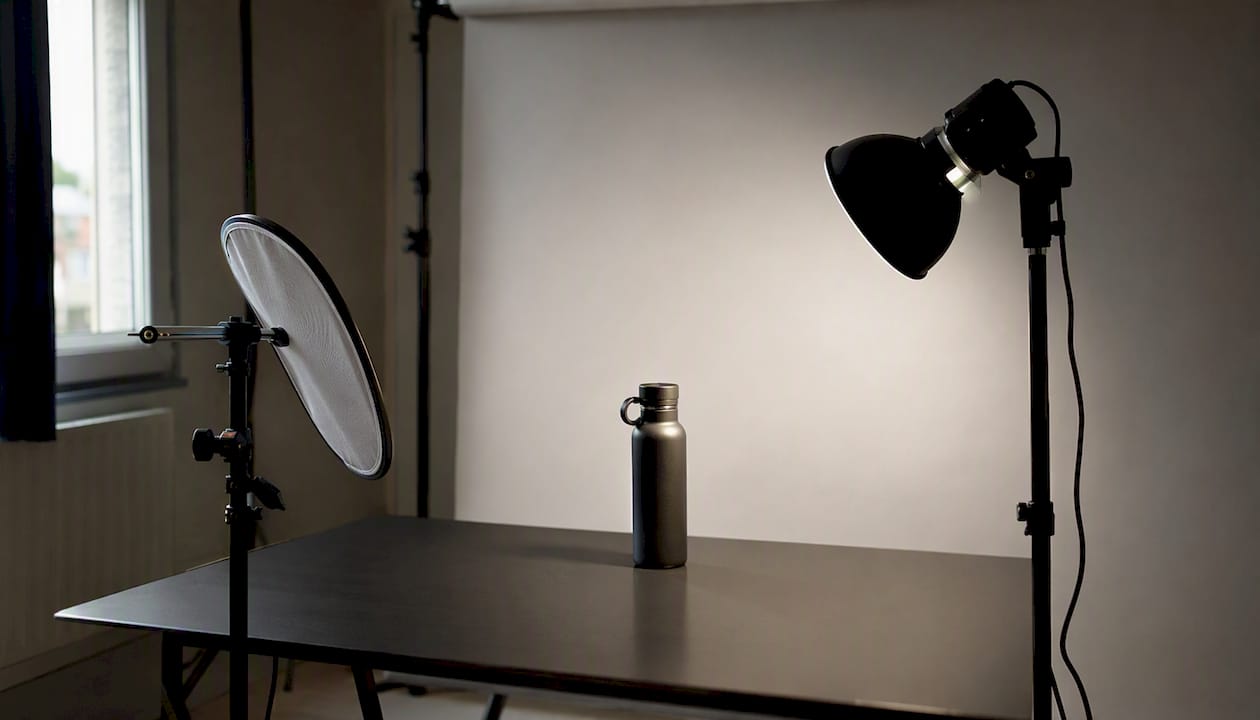
When natural light is unreliable (a common problem in the UK), a two-light rig gives you consistent results any time of day.
| Light | Position | Modifier | Purpose |
|---|---|---|---|
| Key light | 45° to the side, slightly above | Softbox or shoot-through umbrella | Main illumination |
| Fill light | Opposite side, same height | Reflector or second softbox at half power | Reduces shadow depth |
Set both lights to a colour temperature of 5500K to match daylight. Lock your camera's white balance to the same value. This keeps skin tones and product colours accurate without heavy correction in post. Adobe Lightroom is the standard tool for fine-tuning white balance across a set of images after the shoot.
Troubleshooting common lighting problems
- Harsh shadows: move the key light further from the product or add a larger modifier
- Blown highlights on shiny packaging: angle the light at 45° rather than head-on, or use a polarising filter
- Flat, dull images: add a small reflector close to the product on the shadow side to create a subtle gradient
- Colour casts from walls or coloured props: set a custom white balance using a grey card
Pro Tip: You can fake an outdoor or premium location indoors with a tight crop, a blurred background, and a portable LED panel set to warm daylight. A wooden chopping board, a handful of dried botanicals, and a 5600K LED strip can read as a sunlit kitchen counter.
Where do you source props and how do you style a believable scene?
Every great lifestyle shot starts with one sentence: "My customer is doing X with this product." That sentence decides the surface, the props, the light, and the crop. Without it, you end up with a pretty arrangement that tells the buyer nothing.
Prop selection rules
- Match scale: props should not dwarf the product or disappear beside it
- Limit your palette to two or three colours that complement the product's packaging
- Choose textures that suggest the product's context (linen for bedding, slate for food, marble for skincare)
- Remove anything with a competing logo or brand name from the frame
UK sourcing list
- Zara Home for ceramics, textured linens, and glassware that photograph well
- H&M Home for affordable cushions, throws, and tableware in neutral tones
- Etsy UK for handmade props, dried botanicals, and unique small items that add character
- Sainsbury's homewares for trays, linens, and tableware at low cost
The Folksy blog's at-home photography tips are worth bookmarking for prop ideas specific to makers and small sellers.
Backdrop and surface ideas
- A sheet of white or grey cartridge paper taped to a wall and curved onto a table creates a seamless sweep
- Cheap wooden boards from a DIY shop or offcuts from a timber merchant give a natural, warm surface
- Vinyl backdrops (£20–£35 on Amazon UK) are reusable and wipe clean
- Fabric drapes from a haberdashery add softness for beauty, candle, or clothing shots
Three mini-scene ideas to try today
- Kitchen counter breakfast: coffee mug, a small plant, morning light from the left, product placed naturally to the right
- Bedside candle scene: linen fabric, a hardback book, warm LED light at 3200K, product in the foreground
- Commuter bag pocket: product half-tucked into a bag, outdoor light, slight motion blur on the background
Pro Tip: Buy one or two hero props you reuse across every shoot. Consistency in props builds visual brand identity faster than variety.
How do you compose and direct hands or models for natural shots?
Composition is where most DIY shoots go wrong. A technically sharp image with a cluttered frame or a stiff hand in the corner will underperform a slightly softer image with a clean, natural arrangement.
Composition basics
- Place the product on one of the rule-of-thirds intersections, not dead centre
- Leave negative space in the direction the product "faces" or the hand reaches
- On mobile crops (square or 4:5), the product must be readable at thumbnail size; zoom out and check before you shoot
Directing hands
- Ask the person to relax their fingers before the shot, not during it
- Shoot during movement (lifting, pouring, opening) rather than a held pose; motion reads as natural
- Thumb placement matters: a thumb gripping the side of a bottle looks tense; a thumb resting lightly looks relaxed
- Time the shutter at the peak of movement, not the start or end
Model or no model?
Full models work well for apparel, fitness, and lifestyle products where body context is part of the story. Partial crops (hands, forearms, a shoulder) suit beauty, food, and tech products where the product is the hero. Still lifes with no person at all are fine for home décor, stationery, and packaging shots.
A single well-directed hand in frame can increase a shopper's sense of scale and ease of use more than any amount of copy. The Riverflow lifestyle photography guide notes that use cases and routines drive stronger engagement than decorative scenes alone — the hand is the shortcut to showing both.
Pro Tip: Before you direct anyone, take a test frame with your own hand. You will immediately see whether the framing, light, and product placement work before you involve another person.
What camera settings should you use for product shots?
Shoot in RAW whenever your camera or phone allows it. RAW files retain full colour and exposure data, which means you can correct a slightly warm or cool white balance in post without degrading the image. JPEG files bake those decisions in at the point of capture.
Step-by-step shoot workflow
- Set up your scene and lock your white balance before you touch the product
- Take a test frame and check exposure on a histogram, not the screen preview
- Shoot your hero frame (product prominent, clean background)
- Shoot scale and in-use variants without moving the main light
- Move in for detail shots (texture, label, finish)
- Capture packaging and unboxing if relevant
- Shoot at least one contextual or lifestyle variant per product
- Back up your RAW files before you move anything
Consistency tips
- Label files by scene and shot type (e.g.
candle_hero_01.RAW,candle_detail_03.RAW) - Use a phone shot-logger app or a simple notes file to record settings per scene
- Capture a colour checker card in the first frame of each new lighting setup; it saves time in post
How do you edit lifestyle images for a consistent, on-brand look?
A consistent edit across a set of images signals professionalism far more than a single perfectly retouched frame. Adobe's photography guidance makes this point clearly: editing consistency multiplies perceived quality across a whole gallery.
A simple edit recipe
- Exposure: lift shadows slightly, pull highlights back on shiny surfaces
- White balance: match to your grey card reading or the scene's intended warmth
- Contrast: a gentle S-curve rather than the Contrast slider, which is blunt
- Clarity: +10 to +20 for texture-heavy products (food, fabric, wood); 0 for skincare or beauty
- HSL: desaturate competing background colours; boost the product's key colour slightly
Tools to use
Adobe Lightroom (desktop) is the standard for batch editing and preset creation. Lightroom Mobile syncs presets from desktop and works on both iOS and Android. For phone-only edits, Snapseed's selective tool handles local corrections well, and VSCO offers consistent film-style presets if your brand suits that aesthetic.
Export settings by platform
- Shopify product pages: JPEG, sRGB, longest edge 2048px
- Instagram (square): JPEG, sRGB, 1080 × 1080px
- Paid ads (Meta): JPEG or PNG, sRGB, 1200 × 628px (landscape) or 1080 × 1080px (square)
Pro Tip: Create one Lightroom preset from your best image and batch-apply it to the rest of the set. Adjust exposure per image if needed, but keep white balance and colour grading locked. This is the fastest way to make a DIY shoot look like a studio set.
What are the best shot ideas for a ten-image lifestyle set?
A structured shot list keeps you focused and ensures you leave the session with a usable, balanced gallery. Prodoto's planning guide recommends treating every image as an answer to a buyer question: scale, use, detail, or occasion.
Your ten-shot plan
- Hero: product prominent, clean background, full packaging visible
- Scale: product held in a hand or placed next to a familiar object
- In-use: product being actively used (pouring, applying, wearing, opening)
- Detail: close-up of texture, label, finish, or key feature
- Packaging: box, bag, or wrapping styled with a simple prop
- Contextual scene 1: product in its natural setting (kitchen, desk, bathroom)
- Contextual scene 2: a different angle or time-of-day mood for the same setting
- Lifestyle variant: partial model (hands, forearm) interacting with the product
- Flat lay: overhead arrangement with complementary props
- Platform crop: a tight, square-friendly version of your hero or in-use shot
Mapping shots to product types
- Home décor: hero, flat lay, contextual scene, detail (texture)
- Beauty/skincare: in-use, detail (label/finish), lifestyle variant (hands), hero
- Apparel: full model or flat lay, detail (fabric/label), in-use (worn in context)
- Small electronics: scale, in-use, detail (ports/screen), packaging
- Food/snacks: contextual scene (table setting), detail (texture), in-use (being eaten or prepared)
Shoot in sequence to save time
Set up your hero shot first, then shoot all variants from that position before moving the light. Detail shots come last because they often require a different lens or a macro mode. Shoot the flat lay as a separate setup at the end.
Pro Tip: Before the shoot, save ten reference images to a shared folder or a printed moodboard. Put it somewhere you can see it on set. You will make faster decisions and maintain a consistent mood across all ten frames.
When should you hire a professional photographer instead of shooting DIY?
DIY works well for social content, early-stage product testing, and ongoing content needs where speed matters more than perfection. There are clear situations where commissioning a professional is the better call.
Hire a pro when:
- You are launching a new product and need hero images for paid ads, a website, and print simultaneously
- Your product requires food styling, live models, or specialist props you cannot source yourself
- You need consistent images across 20+ SKUs with platform-ready crops for Shopify and Amazon
- Your brand positioning is premium and the images need to reflect that from day one
- You have tried DIY and the results are not converting
What a professional shoot typically includes
- A creative brief and mood board review before the shoot date
- Set build, prop sourcing, and model booking handled by the studio
- Full lighting setup with consistent results across all products
- Post-production retouching and colour grading
- Platform-ready exports (Shopify, Amazon, Meta, print)
Questions to ask before you book
- Can I see examples of lifestyle work for similar products?
- What is included in the day rate and what costs extra (models, props, retouching)?
- How many final selects will I receive and in what formats?
- What is the turnaround time for edited files?
Jarvisandco's commercial photography service covers brief development, set build, and full post-production for UK businesses. For ecommerce product photography specifically, the team handles platform-specific crops and consistent colour grading across a full catalogue.
Pro Tip: If you are unsure whether to DIY or hire, shoot one product yourself first. If the images look right at thumbnail size on your phone, you probably do not need a studio yet. If they look flat or unconvincing, that is your answer.
Why consistent product visuals are worth the investment
Most small businesses underestimate how much their product images are doing. A visitor to your website or product page decides within seconds whether the brand feels credible. The image is usually the first thing they see, and it carries the weight of that first impression.
The mistake many brands make is treating photography as a one-off task rather than a recurring asset. A set of strong lifestyle images, shot consistently and edited to a single preset, can be repurposed across your website, social channels, email campaigns, and paid ads for months. The cost per use drops every time you reuse an image. A single well-planned shoot, whether DIY or professional, tends to pay for itself quickly when the images are genuinely good.
The brands that get this right share one habit: they plan before they shoot. A clear brief, a shot list, and a defined customer moment produce images that answer buyer questions. Images that answer buyer questions convert. It is that direct.
Jarvisandco photography: professional results without the guesswork
If you have worked through this guide and decided your brand needs professional-grade images, Jarvisandco's photography team is ready to help. We handle the full process: creative brief, set build, prop sourcing, lighting, shooting, and post-production retouching, all delivered as platform-ready files for your website, social channels, and paid ads.
You tell us the product, the audience, and the channels. We take care of everything else. Most shoots are turned around within five to seven working days, and every project includes a pre-shoot brief call so we are aligned before anyone picks up a camera.
Get in touch with Jarvisandco to request a quote or view our portfolio, or head to our photography services page to see what a full commercial shoot includes.
Sources
Authoritative sources used in this guide
- What is product photography and how do you do it? - Adobe
- How To Plan A Lifestyle Product Photography Shoot | Prodoto
- Lifestyle product photography — ExpertPhotography
- Product Shot Tips - How to take awesome lifestyle photos in your ...
UK prop and backdrop suppliers
When photographing branded products, always follow the brand's usage guidelines and avoid implying endorsement through prop placement or scene context.