
Upload product images at 2048 × 2048 pixels and compress them to 100–300 KB. Shopify caps uploads at a maximum of 5000 × 5000 pixels and 20 MB per file, with a minimum of about 800 × 800 pixels needed for zoom functionality. Stick to JPEG or WebP for photos, PNG for transparency, and let Shopify's CDN handle the rest. It automatically serves WebP to browsers that support it.
TL;DR:
- Upload product images at 2048 × 2048 pixels in JPEG or WebP format to balance Retina quality with page load speed, with a 20 MB file limit.
- Maintain consistent aspect ratios within product ranges and ensure images meet the minimum 800 × 800 pixel size for zoom functionality to avoid blurry or missing zoom.
- Use 1920 × 1080 pixels for desktop banners and 800 × 1200 pixels for mobile banners, ensuring slideshow slides have identical dimensions for seamless transitions.
- Optimize images by resizing to recommended dimensions, compressing to 80-85% quality, and stripping unnecessary metadata before uploading.
- Test served image sizes through browser tools to verify proper CDN delivery, especially for mobile variants, and fix common issues like blurriness or slow load times promptly.
Table of Contents
- What are the right Shopify image sizes for every placement?
- Why does Shopify recommend 2048 × 2048 for product images?
- What sizes work best for banners, sliders and blog images?
- Which image format should you upload to Shopify?
- What are Shopify's upload limits and how do you avoid errors?
- How do you export and compress images before uploading to Shopify?
- How does Shopify's CDN serve different image sizes to different devices?
- What are the most common Shopify image problems and fixes?
- How Jarvis & Co applies these standards on real Shopify builds
- What actually matters for Shopify images in 2026?
- How Jarvis & Co can help with your Shopify images
- Sources
What are the right Shopify image sizes for every placement?
Every image slot on a store has its own sweet spot, and guessing wastes time you don't have. Here's a reference covering the placements that matter most.
Sizes below assume square or landscape crops depending on the theme's grid, but the file-size targets hold regardless of theme.
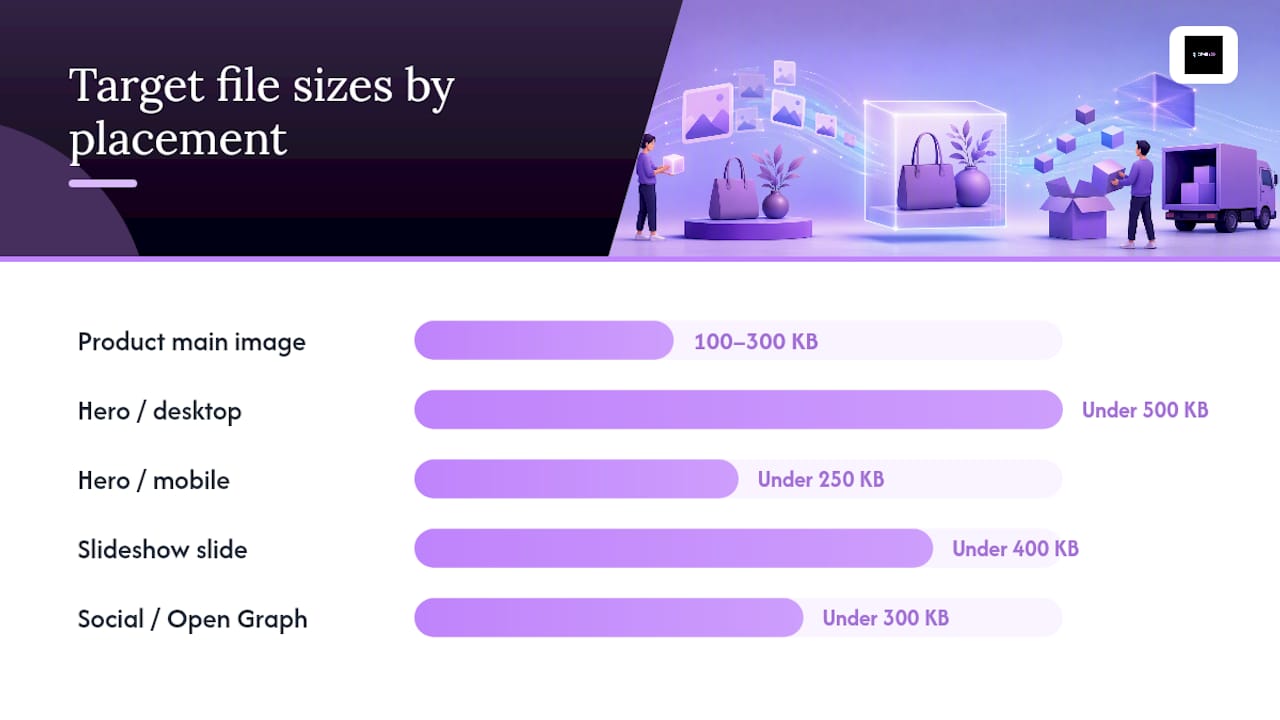
| Placement | Recommended dimensions | Aspect ratio | Target file size |
|---|---|---|---|
| Product main image | 2048 × 2048 px | 1:1 | 100–300 KB |
| Product variant thumbnails | 800 × 800 px | 1:1 | 100–300 KB |
| Collection image | 1200 × 1200 px | 1:1 | 100–300 KB |
| Hero/banner (desktop) | 1920 × 1080 px | 3:2 | Under 500 KB |
| Hero/banner (mobile) | 800 × 1200 px | 2:3 | Under 250 KB |
| Slideshow slide | Match across all slides | Theme dependent | Under 400 KB |
| Blog featured image | 1200 × 800 px | 3:2 | 100–300 KB |
| Logo | 500 × 500 px (SVG preferred) | 1:1 | 100–300 KB |
| Favicon | 32 × 32 px | 1:1 | 100–300 KB |
| Social/Open Graph | 1200 × 630 px | 1.91:1 | Under 300 KB |
A few placements have their own quirks worth flagging. Shopify's own size guidelines for 2026 note that upload caps align well with these recommended dimensions. That gap is intentional. Collection images can technically go much larger, but doing so just slows down your category pages for no visual benefit. Slideshows are the one area where consistency matters more than the exact pixel count. Mismatched slide dimensions cause a visible jump every time the carousel transitions, which looks unpolished on a storefront you've otherwise spent money getting right.
Favicon and logo files sit outside the usual "bigger is better" logic entirely. A crisp 32 × 32 favicon rendered from a clean vector source will always beat a shrunk-down JPEG, which typically turns muddy at that size.
Why does Shopify recommend 2048 × 2048 for product images?
The 2048 × 2048 figure isn't arbitrary. It's the point where a product photo has enough resolution for retina displays and pinch-to-zoom, without ballooning into a file that drags down your page load times. Shopify's own guidance settles on this size precisely because it balances those two competing needs, and independent analysis backs the same conclusion: a 2048-pixel square image gives you retina-level sharpness while keeping page weight sensible.
Shopify's content delivery network then resizes that master file down to whatever the theme actually needs, whether that's a 300-pixel thumbnail in a collection grid or a full-width hero crop. You upload once at 2048 × 2048, and the CDN does the rest.
There are exceptions worth planning for. Products where customers inspect fine detail, such as jewellery, art prints, or textiles with intricate patterns, sometimes justify a higher-resolution source file so zoom doesn't reveal soft edges or compression artefacts. The trade-off is page weight and storage, so reserve this for genuinely detail-critical categories rather than applying it store-wide.
For the zoom feature to function at all, Shopify needs an 800 × 800 pixel minimum. Anything smaller and the zoom option either disappears or produces a blurry result that undermines trust at exactly the moment a shopper is examining a product closely.
Aspect ratio consistency across a product range matters more than most merchants assume. Mixing square and portrait crops within the same collection grid creates visual noise and uneven card heights, which independent research on Shopify image sizing links to a less professional-looking storefront overall. Pick one ratio per product family and hold every SKU to it.
- Standard product photography: 2048 × 2048, square crop
- Jewellery, art, or texture-heavy goods: consider a higher-resolution source, cropped consistently
- Apparel on models: often works better as 4:5 or 2:3 portrait, applied uniformly across the range
- Flat lay or accessory shots: square crop keeps grids tidy
Pro Tip: Photograph everything at your highest practical resolution, then downsize to 2048 × 2048 during export. You can always go smaller later; you can't recover detail from an undersized original.
What sizes work best for banners, sliders and blog images?
Marketing imagery lives by different rules than product photography, mostly because it has to survive being cropped across wildly different screen shapes.
A desktop hero banner usually works well at about 1920 × 1080 pixels, fitting most monitors. For mobile, many themes offer a dedicated image around 800 × 1200 pixels in portrait orientation to avoid cropping or shrinking.
Slideshows carry one hard rule: every slide must share identical dimensions. Guides on Shopify's image reference standards flag mismatched slide sizes as a common cause of the visible jolt shoppers see mid-transition, which reads as sloppy even on an otherwise well-designed homepage.
- Desktop hero/banner: 1920 × 1080 px, under 500 KB
- Mobile hero/banner: 800 × 1200 px, under 250 KB
- Slideshow slides: match dimensions exactly across every slide in the set
- Blog featured image: 1200 × 800 px, landscape 3:2 crop
- Social/Open Graph preview: 1200 × 630 px, so shared links render properly on social platforms
Get the Open Graph size wrong and your beautifully designed page can show up as a cropped, off-centre mess when someone shares it on social media, which is a needless way to undercut a marketing push you've already paid for.
Which image format should you upload to Shopify?
Shopify accepts JPG, PNG, WebP, HEIC, GIF, and SVG, and its image service automatically selects the best format for whatever browser is requesting the page. In practice, that means you can upload a JPEG and Shopify will still serve WebP to visitors on modern browsers, shrinking file size without any extra work on your part.
That doesn't mean format choice at upload stage is irrelevant. Here's the practical breakdown:
- JPEG: the safe default for photography, universally supported, good compression at 80 to 85 percent quality
- PNG: reserve this for images that need a transparent background, such as logos placed over coloured sections
- WebP: smaller file sizes than JPEG at equivalent quality, and Shopify serves it automatically where supported
- GIF: still the format for simple animation, though WebP now handles animated content too
- SVG: the right choice for logos and icons, since vector files stay sharp at any size and weigh almost nothing
The rule of thumb: photograph in JPEG, brand assets in SVG or PNG, and let Shopify's automatic delivery handle the WebP conversion on the front end. You rarely need to manually export WebP yourself unless you're chasing every last kilobyte on a particularly image-heavy page.
What are Shopify's upload limits and how do you avoid errors?
Shopify enforces maximum upload limits of 5000 × 5000 pixels and 20 MB per file. A file must meet both to upload successfully; being under one limit but exceeding the other will cause rejection.
Treat these caps as ceilings, not targets. Nothing about your storefront benefits from uploading anywhere near the maximum. Recommended dimensions such as 2048 × 2048 sit deliberately far below the cap, and that headroom exists so your CDN-generated variants still look sharp after resizing.
- If an upload fails on dimensions, resize the source file down to 2048 × 2048 before re-exporting
- If it fails on file size despite reasonable dimensions, run it through a compressor rather than shrinking the pixels further
- Product listings support multiple images per SKU, so there's rarely a practical reason to cram excessive detail into a single oversized file
- Batch-check a folder's dimensions before a bulk upload; catching one oversized file before upload saves more time than troubleshooting a failed import afterwards
How do you export and compress images before uploading to Shopify?
A repeatable export workflow saves far more time than fixing images after they're already live and slowing down your store. Here's the sequence worth building into your process.
- Shoot or source at high resolution. Always capture more detail than you need; downsizing is lossless, upsizing is not.
- Crop to your chosen aspect ratio first, before resizing, so you're not distorting the image to fit a frame later.
- Resize to the target dimension. For most product shots, that's 2048 × 2048; for hero banners, 1920 × 1080.
- Export at JPEG quality 80 to 85. This range consistently lands product images inside the recommended 100–300 KB window without visible quality loss on a typical screen.
- Choose progressive JPEG encoding where your export tool offers it, so images render gradually rather than loading top to bottom on slower connections.
- Run the file through a dedicated compressor. Free tools like GIMP or Squoosh handle this well, and both let you compare file size against visual quality before committing to an export.
- Strip unnecessary metadata such as camera EXIF data and colour profiles you don't need, which trims a surprising amount of dead weight from an otherwise optimised file.
- Name the file descriptively, using lowercase words separated by hyphens, such as
navy-wool-jumper-front.jpgrather than a camera's defaultIMG_4821.jpg. - Write meaningful alt text for every image, following the W3C's guidance on alternative text, both for accessibility and because Shopify surfaces alt text in image search results.
For stores updating catalogues frequently, batch-processing tools or a build-step script that automates steps four through seven removes the manual repetition entirely, which matters once you're managing hundreds of SKUs rather than a dozen.
Pro Tip: Keep a template export preset saved in your editing tool: fixed pixel dimensions, fixed quality setting, fixed colour profile. Consistency across a catalogue matters more than perfecting any single image.
How does Shopify's CDN serve different image sizes to different devices?
Shopify's image service generates resized variants automatically using width parameters appended to the image URL, commonly formatted as ?width= followed by a pixel value. A theme requesting a 400-pixel thumbnail pulls a 400-pixel variant from the CDN rather than downloading your full 2048-pixel master file and shrinking it in the browser, which would waste bandwidth on every single page view.
This matters because it changes what you actually need to prepare manually. In most cases, you don't need to create separate mobile-specific image files. The CDN and your theme's responsive image tags handle that automatically, serving smaller variants to smaller screens. Where it's worth intervening manually is art-directed content, such as a hero banner where the mobile crop genuinely needs a different focal point than the desktop version, not just a smaller version of the same frame.
- Check what's actually being served using your browser's developer tools, specifically the Network tab, filtered by image requests
- Compare the file size Shopify serves against your original upload; the CDN variant should be noticeably smaller on mobile
- Measuring the served file rather than the source file gives you the real picture of what's affecting page speed, since your uploaded master file is rarely what a visitor's browser actually downloads
- If your Largest Contentful Paint score is poor despite following these size guidelines, check whether lazy-loading or theme settings are delaying the hero image unnecessarily
What are the most common Shopify image problems and fixes?
Most image issues on Shopify trace back to one of a handful of causes, and most have a quick fix once you know what to check.
- Blurry product photos: usually means the source image sat below the 800 × 800 zoom minimum; re-export from a higher-resolution original
- Zoom feature not appearing: check the uploaded dimensions meet the 800 × 800 threshold; Shopify silently disables zoom below it
- Slow page load, poor LCP score: check file sizes against the 100–300 KB target for product images and under 500 KB for heroes; recompress anything oversized
- Inconsistent image heights in collection grids: almost always an aspect-ratio mismatch across the product range; standardise the crop ratio and re-export
- Slideshow jumping between slides: confirm every slide shares identical pixel dimensions
- Social share previews look wrong: check your Open Graph image meets the 1200 × 630 specification
If resizing and recompressing don't resolve a layout issue, the problem often sits in the theme's code rather than the image itself, and that's the point to bring in a developer rather than keep re-exporting files that were never the actual cause.
How Jarvis & Co applies these standards on real Shopify builds
Every Shopify build we run comes down to the same core tension: speed against detail. A jewellery brand needs zoom sharp enough to show craftsmanship; a homeware store selling dozens of SKUs per collection needs pages that load instantly on mobile data. Getting that balance right, placement by placement, is what separates a fast, professional storefront from one that just looks good in isolation.
We brief photographers against the exact specs in this article before a shoot even starts, not after, because reshooting costs far more than getting the crop and lighting right the first time. Our product photography guidance covers what we ask clients to prepare before a shoot day.
Pro Tip: Send your photographer a one-page brief with exact pixel dimensions, aspect ratio, and background requirements before the shoot, not after. It's the single cheapest way to avoid a costly reshoot.
What actually matters for Shopify images in 2026?
If you take one thing from this, prioritise Largest Contentful Paint and mobile variants over chasing maximum resolution. Most stores lose more to slow-loading hero images than they gain from marginally sharper product shots. Keep aspect ratios consistent across a catalogue, write proper alt text on every image, and test what your CDN actually serves rather than assuming your uploads are the bottleneck.
DIY compression and resizing suit a lean catalogue you update occasionally. Once you're managing hundreds of SKUs, multiple collections, and a homepage that needs to convert on both desktop and mobile, that's usually the point where a professional build pays for itself.
— Luke
How Jarvis & Co can help with your Shopify images
Getting every one of these specs right across a full catalogue, on top of building a theme that actually uses them well, is a lot to manage alongside running a business. That's the gap Jarvis & Co fills: we handle the Shopify build, the photography brief, and the image optimisation audit together, so nothing falls through the cracks between the photographer, the developer, and the launch date.

Our Shopify design and development service covers everything from theme setup to product photography direction, and we can also run an image optimisation audit on an existing store to flag oversized files, missing alt text, and inconsistent aspect ratios before they cost you conversions. If your product pages feel slow or your gallery looks inconsistent, get in touch through our website design service page and request a store audit. We'll tell you exactly what needs fixing and what it'll take to get there.
Sources
- Website image size guidelines for 2026 - Shopify UK
- Shopify product image size guide 2026: recommended dimensions, formats, and limits - Craftshift
- Shopify Product Image Size Guide: 2026 | Pixelense